Unity Collider/Rigidbody Setups in XR
The subject matter of this article was learned while making Temple Raid VR (a VR climbing game) and Starskipper (a VR zero-gravity climbing game).
XR Rigs can become a deep GameObject hierarchy. Game features can require that a player’s head, hands, body, and tracking space all trigger different actions when colliding with certain scene objects. In this article we will explore an increasingly detailed XR Rig and in the process explain how Rigidbody and Collider hierarchies work in a deep GameObject hierarchy.
Prerequisite Reading
This article discusses advanced material. Before reading it you should read through the manual documentation pages on Rigidbodies and Colliders.
A Single Rigidbody in a XR Rig
So, you have decided to create a XR project. Terrific! One of the first things you may want to do is have game logic occur when a player touches a trigger. As such, you add a Rigidbody to the top of your XR Rig hierarchy on the root GameObject. Since we don’t want physics to move the XR Rig, we will make the Rigidbody kinematic and we will disable “Use Gravity.” Kinematic objects are not affected by gravity, but I like to do both of these anyway.

Here we have created a compound collider formed of a sphere collider on the head and a box collider on each hand. In the screenshot above you can see a purple trigger. If you move the player’s head or either hand into this trigger, you will receive Trigger messages on the XR Rig GameObject. A quick component that prints out debug messages during OnTrigger messages shows this in action:
Great, now we have collisions working when a player touches a trigger! So far so good. From this stage, we can trigger game messages through components on the XR Rig. However, there isn’t a way to tell if it was the head or hands that caused the OnTrigger messages. Only the XR Rig GameObject receives these messages. This is because it is the Rigidbody on that GameObject which sends the messages, and it only sends them to other components on the same GameObject. It is unaware of which collider specifically triggered the collision. To achieve increased granularity, we will have to slightly modify our setup.
A Rigidbody on Each XRNode
As mentioned in the previous case, OnTrigger and OnCollision messages are sent to a GameObject if its Rigidbody is part of a collision. To achieve distinct messages for the head, left hand, and right hand we need multiple Rigidbodies.
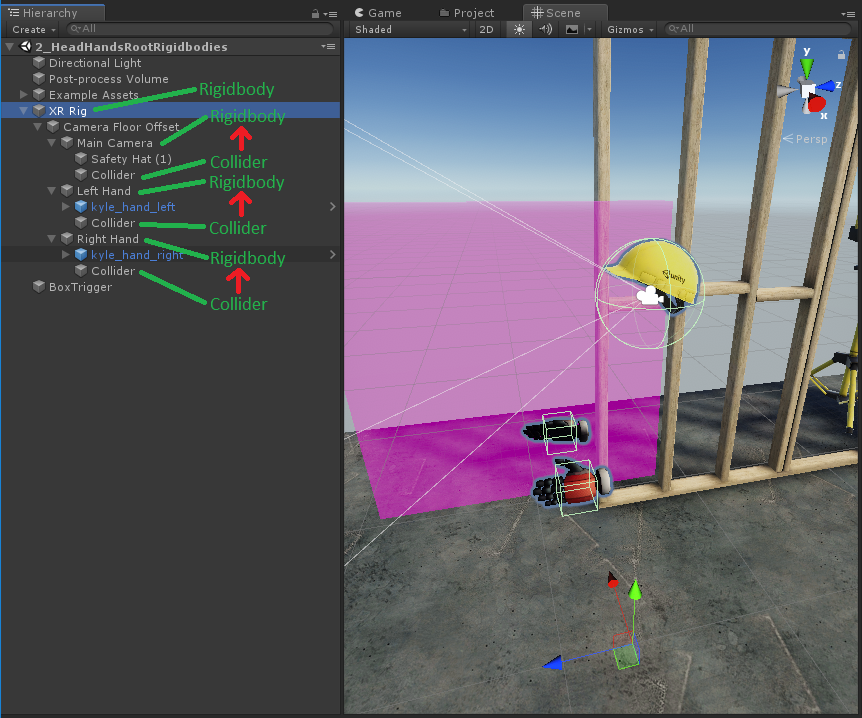
The setup shown here adds a Rigidbody to the Main Camera, Left Hand, and Right Hand GameObjects. Since we don’t want physics to move the XR Rig, we will make the Rigidbody kinematic and we will disable “Use Gravity.” Each new Rigidbody has a single collider under it in the GameObject hierarchy that will cause collisions.
What happens to the Rigidbody on the XR Rig? According to the physics engine, it does not have any colliders. You can think of the Rigidbodies that are lower in the hierarchy “claiming” all Colliders below them. The Left Hand’s collider, for example, will only send collision messages to the Left Hand GameObject because that is where its Rigidbody is located. Again, our quick debug script shows this in action.
Excellent. We could stop here, if this is all that your application requires. However, some applications need to take this one step further. Let’s say you wish to have a better defined collider around the hands, or perhaps you want a body collider to serve as a target in a competitive combat game. How would these mechanics fit into this model?
Rigidbody/Collider Hierarchy
In this last example we will (1) create a body collider and (2) make the hands a compound collider. The adjustments are minor, but each create consequences that you should be aware of when setting up your XR Rig and action logic.
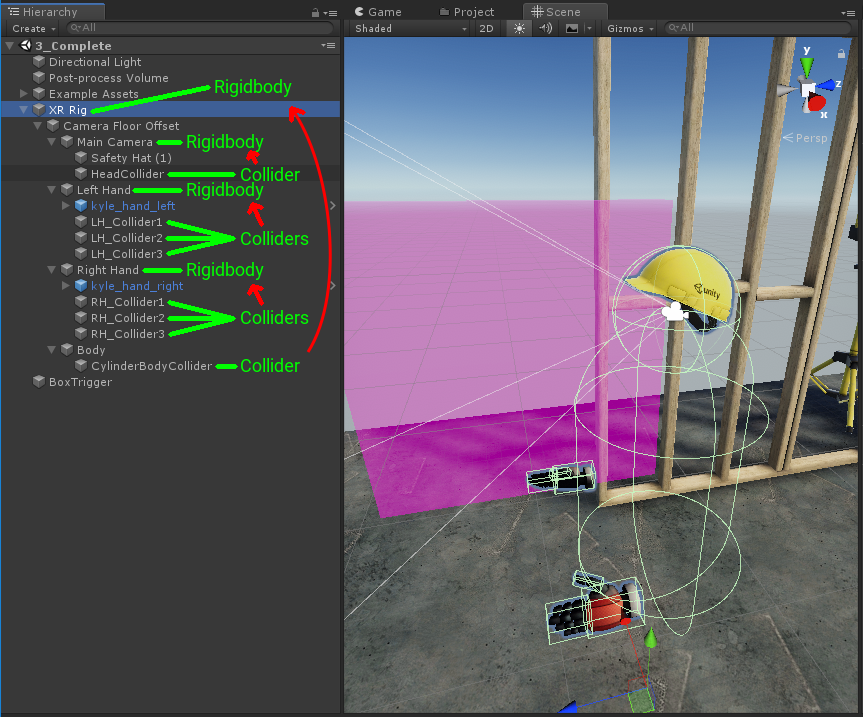
You can see the new hierarchy pictured here. Giving the hands’ compound colliders is as simple as placing the desired colliders under each hand’s rigidbody. There are now three colliders per hand.
Adding the body collider is also relatively simple. Assuming that Player logic scripts are located on the XR Rig, we choose to make a relatively simple Body model. We start by making a Body GameObject at the same level as the camera and hand GameObjects. We will attach a Tracked Pose Driver component that drives the Body’s position based on the head, and on a child GameObject we will put an offset capsule collider to represent the body. Moving up the hierarchy, the first Rigidbody that we encounter is the original XR Rig Rigidbody. This is the Rigidbody that will receive OnTrigger and OnCollision messages.
Now, let’s see these changes in action!
As mentioned, there are some consequences of this new setup. Each collider which composes a hand’s compound collider creates OnTrigger messages. This may or may not be desirable, and so a script may need to keep track of these messages for your logic to fully understand whether or not the hand is or is not touching a trigger. In most cases, a single collider is sufficient for interaction.
Another consequence of this new setup is the effect on maintainability. Since we now have many Rigidbodies and Colliders spread across the GameObject hierarchy, care must be taken when changing the configuration. A complete understanding of the Rigidbodies and Colliders should be obtained before editing to guarantee that a change to one type of interaction does not inadvertently affect a different interaction.
I hope that this case study was helpful in understanding Collider/Rigidbody setups on a XR Rig with a deep GameObject hierarchy. What setups have you run into in your work? I would love to hear about your experience and best practices relating to this topic!